Merry Christmas!

I know, I know, the pretzel cookies are late coming - I will get a recipe up this year, for sure, and post-post it for Christmas Eve. Look for it!

For now, I wish everyone a very merry Christmas, a happy Hanukkah, a late joyous Solstice, and an early happy Kwanzaa!

Enjoy your holiday! I wish you love and cookies.

Cookie Calendar: Pretzel Cookies

pretzel-cookies.jpg

Here's another variation on plain old icebox cookie dough. The recipe calls for vanilla or chocolate dough - I assume because they look most pretzel-like - but I substituted my extra fruit-flavored cookie dough.

You'll notice in the pictures that my cookies are not even remotely pretzel shaped. I elected to make this a kid project at our cookie-decorating party, so I let the dough get very soft. Part of the problem was timing: The dough sat around outside the fridge waiting for us to be ready for it too long. Still, part of the problem was that I feared the kids wouldn't be able to roll snakes with cold dough, and so I took the dough out earlier than I would have for myself.

The kids did easily roll the dough into snakes, but the snakes fell apart when we tried to bend them into shapes. I settled on making looped ribbon shapes with the remaining dough.

I also neglected to make the egg white glaze. I don't know if this negatively affected the luster of the finished product, but it didn't seem to affect the ability of the sparkling sugar to stick where it managed to hit the dough.

Happy Holidays, everyone!

My comments in [brackets].

pretzel-cookies.jpgPretzel Cookies
Source: The King Arthur Flour Cookie Companion
Yield: 3 dozen pretzels

1 recipe Vanilla Cookie Dough or Chocolate Cookie Dough [or Fruit-Flavored Cookie Dough], chilled
Egg White Glaze
Coarse sugar or pearl sugar [You can find Swedish pearl sugar at Ikea, at least around Christmas.]

1. Preheat the oven to 350 degrees Fahrenheit. Lightly grease (or line with parchment) two baking sheets.

2. Break off a piece of dough the size of a table tennis ball. On a very lightly floured work surface, shape it into a rope about 10 inches long. Form the rope into a pretzel and place it on the prepared baking sheet. Repeat with the remaining dough. Brush each pretzel with the egg white glaze and sprinkle with coarse or pearl sugar.

3. Bake the cookies for 12 minutes, until they feel firm. Remove them from the oven and transfer to a rack to cool.

Egg White Glaze

1 large egg white
1 tablespoon water

Whisk together the egg white and water until slightly foamy. Refrigerate until ready to use.

Cookie Calendar: Marble Cookies

marble-cookies02.jpg

The next couple of recipes are variations on icebox cookie dough. We've already covered pinwheel cookies made with vanilla and chocolate doughs, and we also discussed whipping up fruit-flavored cookie dough. Now, we consider what else to do with all this dough!

Note that these recipes do use King Arthur Flour's recipes for vanilla and chocolate icebox dough. You can find the recipes for those doughs on the Pittsburgh Tribune-Review web site.

I whipped up these marble cookies using half the fruit-flavored dough I'd made (I saved the rest for tomorrow's pretzel cookies). I didn't set out to make marble cookies, but when I saw just how many hours checkerboard cookies entailed, marble cookies looked just so enticing.

marble-cookies01.jpg

Besides, marble cookies look a lot more like the "play-dough cookies" they sell at bakeries. Surprisingly, the dough does not get muddy looking from all the twisting and folding; each color remains distinct. The effect is elegant, much like the real deal, yet requires much less effort than either checkerboard or pinwheel cookies.

One warning: A lot of guests weren't too keen on the fruity doughs' flavor. I heard it compared to Trix cereal; I can't verify that as I've never tried Trix. There is a distinct Jello tang to the cookies. It might be less noticeable if you didn't mix two fruit-flavored doughs like I did.

It also might stand out less if you hadn't let your red dough sit in the fridge for more than I week like I did. Live and learn.

My comments in [brackets].

Marble Cookies
Source: The King Arthur Flour Cookie Companion
Yield: 4 dozen cookies

Prepare 2 recipes of cookie dough in different flavors -- vanilla and fruit, or vanilla and chocolate, for example. Place a piece of parchment or wax paper on a work surface. Lay 1 piece of dough on the parchment and roll it into a 12- by 9-inch rectangle. Set aside.

Using another piece of parchment or wax paper, roll the other piece of dough just slightly smaller than the first, into an 11 1/2- by 8 1/2-inch rectangle. Brush the Egg White Glaze [see below] over the larger piece of dough.

Tear the smaller piece of dough into irregular shapes and place them haphazardly onto the glazed dough. [The pieces can be stacked on top of each other.] Fold the dough in half crosswise, give it a quarter turn, then fold in half again. On the second fold, gently twist the dough as you fold, as though you were wringing out a cloth; this will increase the marbling effect. It will look messy, but that's OK.

Roll the dough into a log, smoothing the outside, wrap in plastic wrap or parchment and freeze until firm [about 30 minutes is fine].

Use a sharp knife to gently cut the log into 1/4-inch slices. If the dough becomes too soft to handle, place it back in the freezer briefly. Transfer the cookies to the prepared baking sheets.

Bake for 12 to 14 minutes, or until the cookies feel firm. Remove from the oven and transfer to a wire rack to cool.

Egg White Glaze

1 large egg white
1 tablespoon water

Whisk together the egg white and water until slightly foamy. Refrigerate until ready to use.

Cookie Calendar: Chocolate Fudge

chocolate-fudge01.jpg

Fudge may be stretching the definition of "cookie" a bit, but if The King Arthur Flour Cookie Companion can define brownies as a cookie category, than I can throw fudge in as a no-bake bar cookie.

Many people might not even recognize Alton Brown's fudge recipe as "fudge" since it involves no evaporated milk or Velveeta. Processed milk products and chocolate chips make a very-similar-to-fudge candy easy to produce, but most of us wait to get the real deal from a specialty shop.

I certainly can't blame 'em. It takes a long time to produce this confection, waiting for it to hit the correct temperatures and then beating in enough air to turn it from chocolate to fudge. I'm not sure myself if our fudge turned out as it should, but for now it least, it looks good!

Later: Though I stuck the fudge in the freezer to force it to harden, it still turned awfully soft the moment it started to warm up. I put the cut-up squares bag in the freezer to harden again, but they still turned to mush after 15 minutes at room temperature.

I can think of two possible reasons: One, perhaps I didn't whip enough air into the fudge (it did still look a bit shiny); two, maybe it was too humid a day for fudge. The latter seems unlikely in a dry, heated house in the middle of winter, but the results I got seem a lot like what happens to candy makers on wet days.

chocolate-fudge01.jpgChocolate Fudge
Source: Alton Brown
Yield: 64 one-inch pieces

Ingredients

2 3/4 cups sugar
4 ounces unsweetened chocolate
3 tablespoons butter, plus more for greasing pan
1 cup half-and-half
1 tablespoon corn syrup
1 tablespoon vanilla extract
1 cup chopped, roasted nuts, optional

Grease an 8 by 8-inch pan with butter. In a heavy-bottomed saucepan, combine the sugar, chocolate, 1 1/2 tablespoons of the butter, half-and-half, and corn syrup. Over medium heat, stir with a wooden spoon until sugar is dissolved and chocolate is melted. Increase heat and bring to a boil. Reduce heat to medium-low, cover, and boil for 3 minutes. Remove the cover and attach a candy thermometer to the pot. Cook until the thermometer reads 234 degrees F. Remove from the heat and add the remaining butter. Do not stir. Let the mixture cool for 10 minutes or until it drops to 130 degrees F. Add vanilla and nuts, if desired, and mix until well-blended and the shiny texture becomes matte. Pour into the prepared pan. Let sit in cool dry area until firm. Cut into 1-inch pieces and store in an airtight container for up to a week.

Allrecipes' International Cookie Countdown

Allrecipes, compendium of homestyle recipes culled from everyday people, has put together an intriguing collection of Christmas cookies from all over the world. They're counting down the 25 days to Christmas as well, which puts them at cookie number 22 today, but you can scroll back to see everything featured so far.

Makes me wish I lacked both my nasty cold and the foot of snow outside the door so I could do a whole lot more baking in the next couple days.

Cookie Calendar: Snickerdoodles

cookiecalendar.jpgHands down, these were my favorite cookies when I was a kid. Soft and buttery with a hint of cinnamon, and sporting a crazy name like "snickerdoodles" - what wouldn't a kid love?

On top of all that, snickerdoodles require shaping the dough into balls and then rolling the balls in cinnamon sugar, a step perfect for kids who like helping in the kitchen. I loved helping in the kitchen, and I'd often beg to make snickerdoodles just for the chance to roll the dough.

My usual recipe growing up came from the Better Homes and Gardens New Junior Cookbook, which looked a lot dorkier than the version they're selling today. I read that cookbook, full of pictures of kids from the '70s, over and over again, feeding an obsession with cooking that I never grew out of.

Snickerdoodles
Source: Better Homes and Gardens
Yield: 36 cookies

1/2 cup butter, softened
1 cup granulated sugar
1/4 teaspoon baking soda
1/4 teaspoon cream of tartar
1 egg
1/2 teaspoon vanilla
1 1/2 cups all-purpose flour
2 tablespoons sugar
1 teaspoon ground cinnamon

1. In a medium mixing bowl beat butter with an electric mixer on medium to high speed for 30 seconds. Add the 1 cup sugar, baking soda, and cream of tartar. Beat until combined, scraping sides of bowl occasionally. Beat in egg and vanilla. Beat in as much of the flour as you can with the mixer. Using a wooden spoon, stir in any remaining flour. Cover and chill in the refrigerator for 1 hour.

2. In a small mixing bowl combine the 2 tablespoons sugar and the cinnamon. Shape dough into 1-inch balls. Roll balls in the sugar-cinnamon mixture to coat. Place 2 inches apart on an ungreased cookie sheet.

3. Bake in a 375 degree F oven for 10 to 11 minutes or until edges are golden brown. Transfer cookies to a wire rack; cool.

Cookie Calendar: Soft Gingerbread with Hard Glaze

soft-gingerbread01.jpg

Is it a cop out to post the same recipe twice in one year?

It's not exactly the same, however. I'm giving you a variation today on the crunchy gingerbread I made a few days ago. By changing the size and shape of the cookies, you can make a big, soft, slightly chewy cookie that will get just as many oohs and aahs but won't put you out the effort of making a second batch of molasses cookies.

Plus, I'm throwing in a recipe for an opaque Hard Glaze today. It's all good.

I spread each cookie with a generous dollop of said icing, which thickened considerably upon standing for, well, more than a day before I got around to using it. I then dipped each cookie in a bowl of mixed sprinkles and sparkling sugars I had rescued from the kids' last attempt at decorating gingerbread men.

soft-gingerbread02.jpg

For the Soft Gingerbread Cookies, follow the original recipe for Gingerbread Cookies, but chill the dough in the bowl. Then, use a medium-sized tablespoon cookie scoop (or heaping tablespoons) to portion the dough onto ungreased cookie sheets. Use the bottom of a drinking glass to flatten the balls to rounds about 1/2-inch thick. Bake for 8 minutes, until the cookies start turning slightly golden at the edges and look dry but are still soft. Let them rest on the sheets for a couple of minutes to firm up before removing to a cooling rack.

And now, for the icing on the cookie. I left out the vanilla, so my glaze might look slightly whiter. Still, when I make this for my sugar cookies, I think I'll include the vanilla for a touch of extra flavor.

soft-gingerbread01.jpgHard Glaze for Cookies
Source: The King Arthur Flour Cookie Companion
Yield: 1 1/4 cups glaze

1/4 cup (1 ounce) meringue powder [look for it by the baking supplies at the craft store]
1/4 teaspoon salt
3 to 4 cups (12 to 16 ounces) confectioners' sugar
1/3 to 1/2 cup (2 5/8 to 4 ounces) cool water
1 teaspoon vanilla extract
Food color or coloring paste

1. In a medium-sized mixing bowl, whisk together the meringue powder, salt, and confectioners' sugar. Add 1/3 cup cool water and the vanilla, and stir, or beat on slow speed. The mixture will seem hard and lumpy, but the sugar will dissolve after 4 or 5 minutes and everything will smooth out. Add more water, 1 tablespoon at a time, mixing well after each addition to achieve a spreadable consistency. For a very smooth, shiny glaze, the icing should be the consistency of corn syrup or molasses. For colored icing, add food color or coloring paste a drop at a time.

2. Dip the tops of cooled cookies in the glaze, then sweep a spatula over them to remove the excess. Place cookies on a rack for several hours for the glaze to harden and dry. This may take as long as overnight, depending on the humidity of your kitchen and the consistency of the glaze.

Date Lovers Unite!

. . . and bake some Date Pinwheels:

To us, dates are comforting, sweet, intense. A fresh Medjool date with a filling of cream cheese and some chopped nuts is one of the nicest things on earth. And at holiday time, it’s just not right unless a batch of Date Pinwheels (or two) gets made. They’re the perfect do-ahead cookie, because they need to be rolled and chilled before slicing. And they can certainly be made up and frozen, up to 2 months in advance.


By the way, if you're looking for a tasty hors d'oeuvre for your holiday parties, try stuffing a dried, pitted date with a whole almond, then wrapping the whole thing in 1/2 or 1/3 of a slice of bacon and baking until burnished. They're heavenly as is, but you can garnish them with crumbled blue cheese if you wish.

Cookie Calendar: Fudgy No-Bake Cookies

cookiecalendar.jpgChristmas is creeping up on us, and if baking looks like an ever-fainter possibility for you, you might be in the market for some quick-to-whip-up no-bake cookies.

I remember having a recipe for Fudgy No-Bake Cookies on a recipe card that came in a novel or with a baking set at some point in my childhood. Who knows where that ended up. I remember the basics, though: chocolate, oats, and peanut butter.

You might never guess these cookies had peanut butter, with the way chocolate dominates the flavor. This particular iteration I found on Allrecipes, which seemed closest to what I remembered, calls for chunky peanut butter, but I think ours used smooth. The peanut butter adds richness and a kind of soft, grainy texture.

I've posted several no-bake recipes here, in part necessitated by lack of an oven last year. This recipe, like Rice Krispies Treats, is no bake but not no cook; if you want to stay far from the kitchen, try Holiday Rum Balls or Booze Balls.

Fudgy No-Bake Cookies
Source: Adapted from Allrecipes
Yield: 36 cookies

2 cups white sugar
1/4 cup unsweetened cocoa powder
1/2 cup milk
1/2 cup margarine
1 teaspoon vanilla extract
1 pinch salt
1/2 cup chunky peanut butter
3 cups quick cooking oats

1. In a saucepan over medium heat, combine the sugar, cocoa, milk and margarine. Bring to a boil, stirring occasionally. Boil for 1 minute, then remove from heat and stir in the vanilla, salt, peanut butter and oats.

2. Drop by rounded spoonfuls onto waxed paper. Allow cookies to cool for at least 1 hour. Store in an airtight container.

Cookie Calendar: Pizzelles

pizzelles01.jpg

I will declare here upfront: I like anise-flavored pizzelles.

I don't bother making anise pizzelles, as the flavor is far too controversial around here. A number of the adults are avowed anise/licorice haters, and even those who tolerate or enjoy it tend to prejudice the kids against it.

pizzelles02.jpg

While I must disappoint my anise hopes if I want to avoid dirty looks on Christmas, that doesn't mean I have to stick with plain vanilla. This recipe spices things up with the warm flavor of nutmeg. It calls for cardamom, too, but as I didn't have any kicking around, I subbed in cinnamon.

pizzelles03.jpgThe cookies taste creamily sweet with an eggnoggy hit of spice. They're reminiscent of a mild gingerbread.

Cousin D served as cookie helper today. Though she seemed timid with the eggs and the electric mixer, she dived right into the powdered sugar for the Almond Snowballs.

Pizzelles
Source: Better Homes and Gardens
Yield: 18 pizzelles [I had more.]

2 cups all-purpose flour
1 tablespoon baking powder
1 1/2 teaspoons ground nutmeg
1/2 teaspoon ground cardamom [I used cinnamon.]
3 eggs
3/4 cup sugar
1/3 cup butter, melted and cooled
2 teaspoons vanilla

1. In a medium mixing bowl stir together the flour, baking powder, nutmeg, and cardamom; set aside. In a small mixing bowl beat the eggs with an electric mixer on high speed about 4 minutes or until thick and lemon-colored. Using medium speed, gradually beat in the sugar.

2. Beat in the cooled butter and the vanilla. Add flour mixture; beat on low speed until combined.

3. Heat electric pizzelle iron according to manufacturer's directions. (Or, heat pizzelle iron on range top over medium heat until a drop of water sizzles on the grid. Reduce heat to medium-low.)

4. For each pizzelle, place a slightly rounded tablespoon of batter on pizzelle iron, slightly off-center toward back of grid. Close lid. Bake according to manufacturer's directions. (For a nonelectric iron, bake about 2 minutes or until golden brown, turning once.) Turn pizzelles out onto a paper towel to cool. Repeat with remaining batter.

Cookie Calendar: Rice Krispies Treats

cookiecalendar.jpgI haven't made Rice Krispies treats myself since I was a kid, but my aunt used to make them for every family holiday party. Most of the kids in the family looked forward to the semi-annual tradition greatly (and no doubt there were a number of grown-ups who relished them as well).

My aunt may no longer be with us, but this particular treat makes me think of her forever now.

At the second cookie exchange I attended while living in Las Vegas, one of the young new teachers brought Rice Krispies treats to share as her contribution at the suggestion of the art teacher. She didn't know how to bake, so she appreciated any recipe that would be simple to create. Unfortunately, her treats turned out a little gooier than they should have been, but I don't recall there being any leftovers nonetheless.

Rice Krispies Treats
Source: Kellogg's
Yield: 12 treats

3 tablespoons butter or margarine
1/4 teaspoon salt (optional)
1 package (10 oz., about 40) regular marshmallows OR 4 cups miniature marshmallows OR 1 jar (7 oz.) marshmallow crème
6 cups Rice Krispies

1. In large saucepan melt butter and salt over low heat. Add marshmallows and stir until completely melted. Remove from heat.

2. Add cereal. Stir until well coated.

3. Using buttered spatula or wax paper evenly press mixture into 13 x 9 x 2-inch pan coated with cooking spray. Cool. Cut into 2-inch squares. Best if served the same day.

MICROWAVE DIRECTIONS:
In microwave-safe bowl heat butter and marshmallows on HIGH for 3 minutes, stirring after 2 minutes. Stir until smooth. Follow steps 2 and 3 above. Microwave cooking times may vary.

Note:
Store no more than two days at room temperature in airtight container. To freeze, place in layers separated by wax paper in airtight container. Freeze for up to 6 weeks. Let stand at room temperature for 15 minutes before serving.

The Basics of Butter

The New York Times has published an article about butter's role in your cookie baking:

“Butter is like the concrete you use to pour the foundation of a building,” she said. “So it’s very important to get it right: the temperature, the texture, the aeration.”

Ms. Chu says that butter should be creamed — beaten to soften it and to incorporate air — for at least three minutes. “When you cream butter, you’re not just waiting for it to get soft, you’re beating air bubbles into it,” Ms. Chu said. When sugar is added, it makes more air pockets, she said.

And those air bubbles are all that cookies or cakes will get, Ms. Corriher said. “Baking soda and baking powder can’t make air bubbles,” she said. “They only expand the ones that are already there.”


The article is full of instructions, much like a recipe. And much like a recipe, you should follow the instructions.

The article suggests that people who don't have success with home baking often are not following their directions. If you do have trouble baking, take time to reflect: Are you using level measurements? Are you creaming the butter and sugar until they've lightened in color and turned fluffy? Are you chilling your dough at least as long as the recipe says?

I've been softening my butter regularly this year because I'm using a hand mixer to make doughs here at my grandmother's house. If the butter is cold, the hand mixer has a hard time mashing it so that it can be properly creamed. When I have access to a stand mixer, though, I know I can just cut the butter into pats and pummel it with the paddle attachment for a minute before adding the sugar to warm it up.

I'm glad the article mentions microwave softening is a crock. I've always ended up with partially melted butter when trying that "trick." Don't do it!

Cookie Calendar: Iced Oatmeal Applesauce Cookies

iced-oatmeal02.jpg

Why mess with a classic?

That's what I ask myself every time I bake a recipe for oatmeal cookies that's not the recipe found on the underside of the Quaker Oats canister lid. That recipe turns out perfectly every time: sweet, chewy, and satisfying.

Still, I will give Martha Stewart's folks credit for creating a decent oatmeal cookie so low in fat. This svelte Iced Oatmeal Applesauce Cookies recipe calls for a mere half stick of butter. As you might have guessed if you have familiarity with low-fat baking, the applesauce replaces the moisture lost to fat cutting, in addition to adding its subtle flavor.

The cookies have a more tender, cakey texture than typical oatmeal cookies. They're also sticky, so be sure to use parchment on your cookie sheets.

iced-oatmeal01.jpg

While these won't displace my go-to recipe, at least I can feel better knowing that my helper is taking in healthier cookies as his reward.

We added 1 teaspoon of vanilla, 1/2 teaspoon of cinnamon, and 1/4 teaspoon of nutmeg to the dough for extra flavor. We also subbed in dried cranberries for raisins in half the dough. We'll add the icing to these cookies closer to Christmas Day.

iced-oatmeal02.jpgIced Oatmeal Applesauce Cookies
Source: Martha Stewart Living
Yield: About 2 1/2 dozen cookies

4 tablespoons unsalted butter, melted
1 cup packed light-brown sugar
1/2 cup granulated sugar
1 large egg
1/2 cup chunky-style applesauce
1 1/2 cups old-fashioned rolled oats
1 1/4 cups all-purpose flour
1/2 teaspoon baking soda
1/4 teaspoon baking powder
1/4 teaspoon coarse salt
1 cup golden raisins
1 3/4 cups confectioners' sugar
3 tablespoons pure maple syrup

1. Make cookies: Preheat oven to 350. Put butter and sugars in the bowl of an electric mixer fitted with the paddle attachment. Mix on low speed until combined. Add egg and applesauce, mix until well blended, 2 to 3 minutes. Mix in oats, flour, baking soda, baking powder, and salt. Mix in raisins.

2. Using a 1 1/2-inch ice cream scoop, drop dough onto baking sheets lined with parchment paper, spacing 2 inches apart. Bake cookies until golden and just set, 13 to 15 minutes. Let cool on sheets 5 minutes. Transfer cookies to a wire rack set over parchment paper; let cool completely.

3. Make icing: Whisk confectioners' sugar, syrup, and 3 tablespoons water until smooth. Drizzle over cookies, let set.

Cookies from The Pioneer Woman

I'll post a make-up Cookie Calendar as early as I can tomorrow. The featured cookie will be a new spin on my usual rugelach recipe, which I did bake today along with yet more gingerbread cookies. For now, accept this link to elsewhere while I regroup.

The Pioneer Woman Cooks - Ree Drummond:

It’s Cookie Week here on The Pioneer Woman Cooks, and you know what that means! Or not, since I’ve never had Cookie Week before and had never even considered having anything called ‘Cookie Week’ before this morning, when it suddenly dawned on me that Christmas is next week and aside from My Favorite Christmas Cookies, I have a dang po’ selection of cookie recipes on my site. So that’s how I operate: I see a deficiency somewhere on my site and I declare it ‘The Week of…’ whatever the deficiency is. Then I get it all over with in a few days and I can mark that off my List of Things That Make Me Toss and Turn at Night.

No, I don’t have any issues. Why do you ask?

Today’s offering is one of my all-time favorite holiday cookie recipes: Spicy Molasses Cookies.

Cookie Calendar: Forest Fruit Rugelach

rugelach01.jpg

Yes, I did feature this particular rugelach recipe last year, but I thought rather than feature a recipe I haven't yet made that instead I would tell you how I altered this recipe to fit my taste and ingredients on hand.

The original recipe calls for walnuts and raspberry jam. That's fine and tasty, but why rest on my laurels? I honor traditions, but tweaks keep things interesting.

I substituted chopped pecans for the walnuts. We had half a bag leftover from salad making, true, but pecans are the superior nut. Less bitter, and these days, it seems, less expensive.

rugelach02.jpg

(Three-year-old A did a great job spreading the jam here, but I did forget to tell him to leave a small circle of dough empty in the middle. You'll remember.)

For the raspberry jam, I skipped both the suggested apricot jam and the cherry filling in King Arthur Flour's version in favor of forest fruit jam. I spied a jar at the local Aldi, and it brought me back to last Christmas in Europe. Forest fruit is a standard jam flavor in East-Central Europe, as common as strawberry here. This one featured raspberries and blackberries among other tasty woodland berries.

I've found that rugelach adapt well to any jam or nut you feel inspired to use. You can also sprinkle in dried fruit. Be creative!

I'd suggest using salted butter instead of the unsalted I used to get extra flavor into your cookies. I read a post on shortbread over at the Bakers' Banter blog that suggested as such after I'd already made my dough. Oh well.

rugelach01.jpgForest Fruit Rugelach
Source: Adapted from Kraft Foods
Yield: 64 cookies

8 oz cream cheese, softened
1 cup (2 sticks) butter, preferably salted, softened
2¼ cups flour
1 cup finely chopped pecans
½ cup plus 2 tbsp. sugar, divided
1 tbsp. ground cinnamon, divided
¼ cup forest fruit preserves

1. Beat cream cheese and butter in large bowl with electric mixer on medium speed until well blended. Gradually add flour, mixing well after each addition. (Dough will be very soft and sticky.) Divide dough into 4 portions; place each on sheet of plastic wrap. Pat each portion into 1-inch-thick circle, using floured hands. Wrap plastic wrap around each circle to enclose. Refrigerate overnight.

2. Preheat oven to 325°F. Cover baking sheets with foil or parchment paper. Mix walnuts, 1/2 cup of the sugar and 2 tsp. of the cinnamon; set aside. Roll each portion of dough to 11-inch circle on lightly floured surface, lifting dough occasionally to add more flour to work surface as necessary. Spread each circle evenly with 1 Tbsp. of the preserves.

3. Sprinkle nut mixture over preserves. Cut each circle into 16 wedges. Roll up each wedge, starting from wide side. Place, point sides down, on prepared baking sheets; shape into crescents. Sprinkle with combined remaining 1 tsp. cinnamon and 2 Tbsp. sugar.

4. Bake 25 minutes or until lightly browned. Immediately remove from baking sheets. Cool on wire rack.

Cookie Calendar: Decorator's Dream Cookies

Picture soon!

I put all those tips I expounded upon yesterday (now with pictures!) into practice today. My cutout experience was, far and away, much, much easier this time around. It came even close to meriting the name of today's recipe: Decorator's Dream Cookies.

The dough was thoroughly chilled before I even started to roll, as I let it sit in the fridge for a couple days until I felt confident enough to make cutouts. It held up in storage perfectly.

The moment the dough seemed to soften, I stuck it in the freezer for a few minutes. I kept the dough on the chilled cookie sheets to retain the low temperature for as long as possible. The cold, hardened dough cut cleanly and peeled off the parchment without much trouble.

Which was definitely a good thing, as I cut huge cookies out of this dough (that I forgot to take a picture of before wrapping and freezing - you'll have to wait for Saturday at least!). Those trees and snowmen will get a hard, opaque glaze suitable for writing on with food-safe markers at the kids' Christmas party.

The third round of cutouts, though, I devoted to smaller cookies for us to snack on before Christmas. I have to say, despite being the third rollout, and despite all the extra flour from rolling, these cookies stayed tender. A sweet, delicious confection.

I'd recommend this sugar cookie recipe just as highly as Alton Brown's. His cookies, being plain, are best suited to strongly flavored icings. These cookies, with their hefty dose of extract (I used vanilla), don't need anything more than a glaze. They'd also be fine with bland royal icing.

After all, they are a decorator's dream.

Decorator's Dream Cookies
Source: The King Arthur Flour Cookie Companion
Yield: About 4 dozen 2-inch cookies

1 cup (2 sticks, 8 ounces) unsalted butter
2 cups (8 ounces) confectioners' sugar
2 tablespoons (1 1/4 ounces) light corn syrup
1/4 teaspoon Fiori di Sicilia, or 1 teaspoon vanilla extract or almond extract
1/2 teaspoon salt
1 large egg, lightly beaten with 2 tablespoons water
1 teaspoon baker's ammonia (optional) [for extra-crisp cookies]
3 1/2 cups (14 3/4 ounces) unbleached all-purpose flour

1. In a medium-sized bowl, cream together the butter, sugar, and corn syrup until light and fluffy. Beat in the Fiori or extract and salt. Add the baker's ammonia to the egg and water and stir to dissolve. Add this mixture, along with the flour, to the ingredients in the bowl and beat until smooth. Divide the dough in half, put each half in a plastic bag, and flatten each slightly. Refrigerate for 1 hour.

2. Preheat the oven to 350 degrees F. There's no need to grease the baking sheets.

3. Take one piece of dough out of the refrigerator and flour a clean work surface and the dough. Roll it out as thin or thick as you like; for slightly less crisp cookies, roll it out more thickly. We roll these cookies to a 1/16 to 1/8-inch thickness. Sprinkle flour under and on top of the dough to keep it from sticking to the table or rolling pin.

4. Alternatively, place the dough on parchment and put a sheet of plastic wrap over it as you roll, pulling the plastic to eliminate wrinkles as necessary when rolling. This will keep dough from sticking without the need for additional flour.

5. Cut out shapes with a cookie cutter, cutting them as close to one another as possible.

6. Transfer the cookies to the ungreased cookie sheets (or, if you've rolled right on parchment, remove the dough scraps between the cookies). Bake the cookies just until they're slightly brown around the edges, 8 to 12 minutes, or until they feel firm. Let the cookies cool on the baking sheets for several minutes, or until they're set. Transfer them to a rack to cool completely. Repeat with the remaining dough.

Supermarket Sampler's Junk Foodie on Holiday Cookies

uExpress.com: Supermarket Sampler by Bonnie Tandy Leblang and Carolyn Wyman -- (12/14/2008) WHAT'S NEW ON THE GROCERS' SHELVES FOR THE HOLIDAYS: “Carolyn: There's no question that pre-made cookie dough has come a long way from the Pillsbury tube days. These tubs of holiday-oriented cookie flavors are a perfect example. All produce a cookie at least as good as any sold in a convenience store or fast-food joint, including Otis Spunkmeyer or packaged Mrs. Field's.

But are these good enough for the holidays? It depends on why you're making Christmas cookies. If it's because you need to feed a crowd something that's nearly homemade in quality but don't have time to bake and can't afford the price of cookies in the bakery, these would be perfect.

If you're going to give away the cookies as gifts or it's a memory-making cooking project with the kids, you probably should set aside the time, get a good recipe, and haul out the flour and sugar.”

If a junk food fan who admittedly doesn't cook much can say this - then I rest my case on prettying up store-bought dough.

Taste of Home's Holiday Cookie Countdown

With Food Network's 12 Days of Cookies over, are you craving another hit of partridge-in-a-pear-tree baking fun?

Taste of Home magazine's web site has posted its own 12-day cookie countdown. While I'm too late to get you in for the daily top-12 newsletter this year, they've kindly provided an easy-to-navigate page with pictures and links to every cookie they featured this year (are you listening, Food Network?).

This year's Food Network round-up might well have been posted on the Taste of Home site, what with its frequent focus on ease over elegance this year. On the other hand, give Taste of Home credit: They went all out and offered Peppermint Biscotti and a Gingerbread Tree alongside the minimal-work Colorful Candy Bar Cookies and Chocolate Peanut Butter Grahams.

Anything look inspiring to you?

Cookie Calendar: Gingerbread Cookies

gingerbread01.jpg

I faced down my cookie demons tonight and attempted some honest-to-goodness cutout cookies. No slicing, no pressing - this time, I flattened the dough with a rolling pin and used actual cookie cutters.

It took an hour and a half. For half the cookies.

I did learn a few valuable rollout-cookie lessons.

1. Keep the dough very, very cold. Alton Brown instructed me it was essential on his show yesterday, and today I discovered how right he was. The process went a lot more smoothly when I stuck the dough in the freezer for about 10 minutes after I rolled it out. The cutters pushed through more crisply, and the dough held its shape as I peeled it off the parchment.

2. Roll on parchment. Being able to lift the parchment and peel it back from the cookies made it a lot easier to get them up for transferring to the cookie sheet. A spatula can smoosh the dough, making it lose its shape.

3. Flour generously. AB suggests confectioner's sugar, but I have more flour around. The flour works with the chilling to prevent sticking. It's especially helpful for rubbing on the rolling pin.

gingerbread02.jpg

After two rollings, I elected to form the rest of the dough into small rounds. Cookies turn tougher with each batch you roll out, but I can't bear to throw away the remaining dough.

This recipe produced crunchy cookies, much like gingersnaps. They taste pleasantly spicy, with a strong molasses flavor. For a softer small cookie, bake for less than eight minutes.

Cousin C helped with the cookies today. She's older than A and B, and certainly seems to have experience, but it's hard to keep her interest for long in activities not involving driving a Mario Kart vehicle off a bridge. Oh well.

gingerbread01.jpgGingerbread Cookies
Source: The King Arthur Flour Cookie Companion
Yield: 3 dozen 3-inch cookies

3/4 cup (6 oz) unsalted butter
3/4 cup (6 oz) brown sugar, packed
3/4 (9 oz) cup molasses
1 teaspoon salt
2 teaspoons cinnamon
2 teaspoons ground ginger
1/4 teaspoon allspice or cloves
1 large egg
1 teaspoon baking powder
1/2 teaspoon baking soda
3 1/2 cups (14 3/4 oz) flour

1. In a saucepan set over low heat, or in the microwave, melt butter, then stir in the brown sugar, molasses, salt, and spices. Transfer the mixture to a medium-sized mixing bowl, let it cool to lukewarm, then beat in the egg.

2. In a large bowl, whisk the baking powder and soda into the flour, and then stir these dry ingredients into the molasses mixture. Divide the dough in half, and wrap well. Refrigerate for 1 hour or longer.

3. Preheat your oven to 375°F. There's no need to grease the baking sheets.

4. Once the dough has chilled, take one piece of dough out of the refrigerator, and flour a clean work surface, and the dough. Roll it out as thin or thick as you like; for slightly less crisp cookies, roll it out more thickly.

5. Use flour under and on top of the dough to keep it from sticking to the table or rolling pin. Alternatively, place the dough on parchment, and put a sheet of plastic wrap over it as you roll, pulling the plastic to eliminate wrinkles as necessary when rolling; this will keep dough from sticking without the need for additional flour. For soft dough, or dough to be rolled extra-thin, you may choose to roll right onto the ungreased back of a baking sheet.

6. Cut out shapes with a cookie cutter, cutting them as close to one another as possible to minimize waste.

7. Transfer the cookies to ungreased cookie sheets (or, if you've rolled right onto the parchment, remove the dough scraps between the cookies). Bake the cookies just until they're slightly brown around the edges 8 to 12 minutes, or until they feel firm. Let the cookies cool on the baking sheets for several minutes, or until they're set. Transfer them to a rack to cool completely. Repeat with the remaining dough.

Cook's Illustrated Offers Five Tips to Customize Cookies

If you've ever wished you could better understand the how ingredients work to change the texture of your cookie, you must check out this short article on altering cookie texture from the folks at Cook's Illustrated. Something as simple as melting the butter before you mix it into the dough can make a profound difference in how your cookies turn out.

The link provided, which came from the weekly America's Test Kitchen newsletter, should give you free access to the article. It will eventually stop working without a paid subscription, however, so save a copy of these tips if you want to reference them later.

Good Eats' "The Cookie Clause" On Now

That is, at 8:30 p.m. Eastern. If you're on the West Coast, you can catch it in three hours.

"The Cookie Clause" will repeat at 3:30 a.m., if you want to set your TiVo.

If you're interested in the featured recipes on the show, check out these two posts:

Cookie Calendar: Sugar Cookies

Cookie Calendar: Chocolate-Peppermint Pinwheel Cookies

Cookie Calendar: Iced Citrus Crackle Cookies

citrus-crackles02.jpg

Today's Cookie Calendar pick comes from 2006's Food Network 12 Days of Cookies newsletter. Iced Citrus Crackle Cookies can cut through the the rich buttery and chocolaty cookies on your table this year with a sharp smack of lemon and orange.

Actually, the sourness is tempered by a hefty dose of sugar, both in the cookies and the glaze. While the recipe suggests dying said glaze to match the fruit that inspired the cookies, my five-year-old cousin decided blue and pink were better choices for us. And if that's what the family wants, why stand in the way?

citrus-crackles03.jpg

As I have with almost every batch of cookies I've made so far this season, I went looking for helpers among the many children running through my grandparents' house daily. My three-year-old cousin signed on right away, but we saw two friend helpers fall through before a slightly older and braver kid from the baby-sitting group downstairs managed to make it through the whole dough-making session.

I decided to keep my two very enthusiastic helpers around for the scooping of dough onto the cookie sheets. I let each one try to make an even scoop of dough using my tablespoon disher, but they struggled with filling it, leveling it, and squeezing it out, so I scaled back. I filled the cookie scoop myself and then gave it to each kid in turn to dish out onto the cookie sheet. They then caught on quickly with this task, easily manipulating the handle after a few tries. Moreover, without prompting, they started trying to perfect their scooping technique by aiming to drop each ball where it was supposed to end up on the sheet.

Ah, so proud.

Dishing the dough turned into a mathematics teachable moment as well when the kids got wrapped up in counting how many cookies there were after each ball dropped. Cousin A is in his first year of preschool, so our focus had to be mostly on proper counting technique (so he wouldn't count cookies twice), but I did attempt to get them thinking about adding, too ("If we have eight cookies, and A adds one more to the sheet, how many will we have then?").

citrus-crackles04.jpg

Cousin A loves lemon almost as much as mint apparently. He enjoyed his miniscule dab of raw dough as well as one and a half finished glazed cookies. Cousin B licked the glaze off his fingers but turned finicky at the prospect of taking a bite from the cookie. Methinks he was too shy.

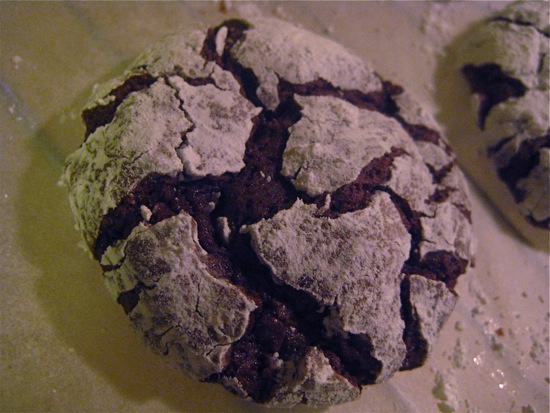
I did alter the recipe a bit. I used clementine zest in the cookie dough, but I used a full teaspoon of lemon extract rather than orange. I didn't have any orange extract, and besides, there's a lot of lemon lovers in the family. I substituted about a teaspoon of lemon extract for the zest in the frosting (I didn't bring a rasp grater with me, and getting zest any other way is a pain). I also replaced the sanding sugar with granulated sugar and a few drops of food coloring. Finally, I dipped each cookie twice, as there was a ton of glaze.

citrus-crackles01.jpg

My cookies didn't end up flat like the ones in the picture. I didn't expect them to, as the recipe calls for freezing the rounded mounds at least 30 minutes prior to baking, then popping them straight in the oven. Beats me how the ones in the picture turned out flat.

My comments in [brackets].

citrus-crackles02.jpgIced Citrus Crackle Cookies
Source: Food Network Kitchens
Yield: 2 dozen cookies [I had 27 . . . then 25 . . . then 22 . . . then 20 . . .]

Dough:
3/4 cup (1 1/2 sticks) unsalted butter, softened
1 1/4 cups sugar
1 tablespoon finely grated citrus zest (Meyer or regular lemon, tangerine or lime)
2 large egg yolks, room temperature
3/4 teaspoon lemon extract (or use all orange extract for tangerine cookies)
1/4 teaspoon orange extract
2 cups all-purpose flour
1/4 teaspoon baking soda
1/4 teaspoon fine salt

Icing:
1 cup confectioners' sugar, sifted
2 tablespoons colored sanding sugar (yellow, orange or green, depending on the flavor of the cookie)
2 to 3 tablespoons freshly squeezed citrus juice (the same flavor of the cookie)

1. Evenly space the oven racks in the oven and preheat to 375 degrees F. on the convection setting, if available. Line 2 baking sheets with parchment paper or silicone mats.

2. Beat the butter in a medium bowl with an electric mixer on medium-high heat until smooth. Add the sugar and citrus zest and continue to beat until light and fluffy, about 2 minutes. (The creaming is important to get a great texture so don't skimp here.) Add the yolks, 1 at a time, beating well after each addition. Beat in the extracts.

3. Whisk the flour, baking soda and salt together in a bowl. Stir the dry ingredients into the wet mixture, mixing at low speed to make a soft dough.

4. Scoop the dough into rounded heaping tablespoons with a cookie scoop or measuring spoon. Space the cookies about 2-inches apart on the prepared pans. Freeze for at least 30 minutes. (The cookies can be frozen for up to 1 month.)

5. Bake the cookies, straight from the freezer, until edges are firm and bottoms are lightly browned, 15 to 17 minutes. Transfer to a rack to cool.

6. For icing: Mix the confectioners' sugar, colored sugar and appropriate flavored zest in a medium bowl. Add the citrus juice and mix with an electric mixer to make a firm but pourable icing. (If needed, add up to 1 teaspoon more juice, but keep in mind that if the icing is too loose it won't set.) Dip the rounded side of the cooled cookies into the icing; then let the excess icing fall back into the bowl. Dry cookies icing side up on a rack. Serve.

7. Store in an airtight container for up to 4 days.

12 Days of Cookies: Stained Glass Wreath Cookies Recipe for MacGourmet

12daysofcookies.jpgIt took 12 days, but we finally got Sandra Lee's spin on store-bought cookie dough.

Unbelievably, this is the second recipe to call for store-bought cookie dough this year. Third, if you count Paula's snowflakes, which the e-mail said could be made with dough from a tube.

Food Network, what happened? Shouldn't cookie recipes include a cookie recipe?

While I'm willing to tolerate the heavy use of convenience products on the net's shows (though I can't help but roll my eyes every time the hosts insist that using a teaspoon from a spice packet or a squirt from a tomato-paste tube will "save money!" - that's bull), isn't the holiday season the one time of year to devote the time to baking from scratch? That's why busy people invented cookie swaps.

I just don't think I need instructions on how to place and bake Pillsbury sugar cookies.

And don't write to tell me your sob story about how you don't know how to bake. If you learned to read, you can bake. Heck, my three-year-old cousin can make cookie dough if you read him the recipe. Judging when the cookies are done baking is the hardest part, and Nestlé can't help you there.

Is this truly the last day for the 12 Days of Cookies? I won't post a round-up for this year until tomorrow passes with no bonus recipe. I hope a recipe does arrive tomorrow, as it's such a down note to end on a "recipe" that's really nothing more than decorating instructions.

Check out today's recipe on Food Network's site, or download Stained Glass Wreath Cookies into MacGourmet.

Gourmet's Favorite Cookies, 1941-2008

Talk about a cookie extravaganza.

Even if cookie baking is not your thing (what has brought you here, then?), if you have any interest in the history of food, you're bound to find Gourmet's collection of cookie recipes fascinating. What made for a great cookie during the food rationing days of World War II? Or during the boom in processed foods during the 50s? Did natural ingredients surge with the rise of hippies? Did cookies go Day-Glo in the 80s?

Some interesting ones:

Sugar Shuttles, 1951: Anticipating the Space Race, perhaps?

Cottage Cheese Cookies, 1962: I imagine this is from the era when cottage cheese lasagna reigned. I'm surprised Gourmet didn't feel an irresistible compulsion to retroactively change it to ricotta.

"Shoe Sole" Cookies, 1970: Cute name. Believe it or not, this one is essentially a "semi-homemade" cookie from Gourmet. You're just fiddling with puff pastry.

Hat Tip: Serious Eats

Cookie Calendar: Fruit-Flavored Cookie Dough

fruit-flavored01.jpgRemember the Pinwheel Cookies? Here's another dough to swirl into those fancy rounds, one that will light up kids' eyes with its psychedelic color.

The secret ingredient that transforms this dough from plain vanilla to a vivid hue is one 3-oz. box of flavored gelatin. You can use whatever flavor makes you happy, but I'm employing strawberry and lime for their Christmas-y colors.

My dough is chilling in the fridge, waiting for kids to come roll it into pretzels (I'll post that recipe soon), but tasted raw, the fruit flavor is as faint as the recipe warns. However, it does have the distinct sour tang of fruity gelatin. We'll see if it lasts when baked.

I made this and one other dough tonight. Wrapped in wax paper and sealed in gallon-sized zipper bags, they'll wait for me to have the time to roll them out. I often stockpile doughs in the fridge when doing my holiday baking, as it's much more efficient to keep reusing the ingredients and tools I have out without stopping to bake.

If you can't wait to bake this dough, visit the Pittsburgh Tribune-Review's web site, which has an excerpt from The King Arthur Flour Cookie Companion giving you recipes for the two other dough flavors plus instructions for the many cookie varieties you can craft from them.

P.S.: Yesterday's sugar cookie entry is now updated, with my baking experiences and beautiful photos. Check it out. Now.

Fruit-Flavored Cookie Dough
Source: The King Arthur Flour Cookie Companion
Yield: Depends on the baking method

3 tablespoons (3/4 ounce) confectioners' sugar
1 (4-serving size) package fruit-flavored dry gelatin mix
3/4 cup (1 1/2 sticks, 6 ounces) unsalted butter
1/2 teaspoon salt, extra-fine preferred
1 1/2 teaspoons vanilla extract
1 1/2 cups (6 1/4 ounces) unbleached all-purpose flour

In a medium mixing bowl, cream the sugar, gelatin mix, butter, salt and vanilla. Add the flour, stirring to make a cohesive dough. Flatten the dough into a disc, wrap in plastic wrap and refrigerate until ready to use.

12 Days of Cookies: Duff's Black and White Cookie

12daysofcookies.jpgMore like blue and white cookies. Or at least one was in the picture, in order to put this classic New York cookie recipe more in the Hanukkah spirit.

No doubt most of America at large was introduced to the black and white cookie through the episode of Seinfeld when Jerry explains how they demonstrate world peace:

The thing about eating the Black and White cookie, Elaine, is you want to get some black and some white in each bite. Nothing mixes better than vanilla and chocolate And yet somehow racial harmony eludes us. If people would only look to the cookie all our problems would be solved. (seinfeldscripts.com)


Of course, he ends up upchucking the cookie, so maybe world peace was too lofty a goal for that treat. Maybe he should try this one next time.

If you're lighting the menorah at sunset this December 21, or if you'll wait to celebrate the season on December 25, these soft, yeast-leavened mini-cakes should serve as a toothsome (and peaceful) complement to your meal.

Check out today's recipe on Food Network's site, or download Duff's Black and White Cookie into MacGourmet.

Serious Eats Blogs Serious Cookies

Food blog extraordinaire Serious Eats is featuring a series of posts on classic holiday cookies. Dig into the "cookies" tag to find multiple recipes for cutout sugar cookies as well as other hits like Linzers and gingerbread men. The site's cookie contributors include Gina DePalma, the pastry chef from Mario Batali's Babbo, so you know the cookies have to be squisito!

Cookie Calendar: Sugar Cookies

ab-sugar-cookies02.jpg

What is Christmas without sugar cookies?

Linzers or spritz, frosted or stamped, homemade or store-bought, sugar cookies grace every holiday table in some form.

As I write this, I have two logs of Alton Brown's sugar cookie dough sitting in the fridge, waiting to be baked. Though he calls for rolling out the dough, I'll attempt to slice off cookies to avoid the hassle. I've read sticking it in the freezer for about half an hour before slicing helps the dough keep its shape. Maybe I made that up. We'll see tomorrow!

I'll update this post tomorrow to detail my experience getting from dough to cookie, plus let you know how they taste. I can tell you that everyone in the kitchen yesterday enjoyed the taste of the raw dough, as I had to keep batting off thieves!

ab-sugar-cookies01.jpg

The Next Day: I did freeze the dough for about 30 minutes before I sliced it. The extra firming made it a breeze to slice into 1/4-inch rounds. No rolling; no mush!

The dough did not spread or puff excessively in the oven, so I'd recommend it for fancy cutout cookies if you have the patience to roll out your dough. Below, you'll see the raw slice on the left, with a baked cookie to its right.

ab-sugar-cookies03.jpg

My cookies needed only seven minutes to bake, but mine were on the small side. In case you're unsure how to tell when your sugar cookies are done, check out these photos:

ab-sugar-cookies05.jpg

Notice that the cookie is just browning on the very bottom edge. When you pull out the cookies, you'll see a bare hint of golden brown right where the dough touches the pan.

ab-sugar-cookies04.jpg

The bottom will look much like this: mostly golden brown, with blond spots, yet no dark brown. I did, in fact, forget to set the timer for one tray of cookies, which took on a decidedly dark brown cast.

ab-sugar-cookies06.jpgSugar Cookies
Source: Alton Brown
Yield: about 3 dozen 2 1/2-inch cookies

3 cups all-purpose flour
3/4 teaspoon baking powder
1/4 teaspoon salt
1 cup unsalted butter, softened
1 cup sugar
1 egg, beaten
1 tablespoon milk
Powdered sugar, for rolling out dough

1. Sift together flour, baking powder, and salt. Set aside. Place butter and sugar in large bowl of electric stand mixer and beat until light in color. Add egg and milk and beat to combine. Put mixer on low speed, gradually add flour, and beat until mixture pulls away from the side of the bowl. Divide the dough in half, wrap in waxed paper, and refrigerate for 2 hours.

2. Preheat oven to 375 degrees F.

3. Sprinkle surface where you will roll out dough with powdered sugar. Remove 1 wrapped pack of dough from refrigerator at a time, sprinkle rolling pin with powdered sugar, and roll out dough to 1/4-inch thick. Move the dough around and check underneath frequently to make sure it is not sticking. If dough has warmed during rolling, place cold cookie sheet on top for 10 minutes to chill. Cut into desired shape, place at least 1-inch apart on greased baking sheet, parchment, or silicone baking mat, and bake for 7 to 9 minutes or until cookies are just beginning to turn brown around the edges, rotating cookie sheet halfway through baking time. Let sit on baking sheet for 2 minutes after removal from oven and then move to complete cooling on wire rack. Serve as is or ice as desired. Store in airtight container for up to 1 week.

12 Days of Cookies: Snowflake Cookies Recipe for MacGourmet

12daysofcookies.jpgOnce is a coincidence; twice engenders paranoia.

After making the Chocolate Crinkles dough yesterday (pictures now posted!), I mixed up a batch of Alton Brown's sugar cookie dough to use for the annual thick-frosted cookies. And today's 12 Days of Cookies recipe?

Sugar cookies.

Specifically, Snowflake Cookies, courtesy of Paula Deen (her second recipe this year). It's the decorating that sets these apart from the millions of other sugar cookie recipes out there, and a frosting recipe is included just for that purpose.

Now's a good a time as any to look this up: Are silver dragées toxic? I've heard you aren't supposed to eat them . . . OK, here's the report: Metallic dragées are edible, but the FDA does not consider them food and recommends they only be used for decoration. They once contained mercury in the silver finish (yuck). However, the only state to ban metallic dragées these days is California.

So if you're reading this from the Golden State, sorry, no shiny snowflakes for you!

Check out today's recipe on Food Network's site, or download Snowflake Cookies into MacGourmet.

Cookie Decorating, Casual and Fancy

The Bakers' Banter blog at King Arthur Flour's web site is a great year-round resource for step-by-step baking instruction. Now, with Christmas on the horizon, the busy bakers have turned their rolling pins toward festive cookies.

Are you a baker who prefers mixing and measuring to messing with icing? Check out PJ Hamel's two cookie-decorating posts for tips on how to churn out beautiful cookies with minimal trouble:

Fancy holiday cookies, without the fuss.

Holiday magic with gingerbread cookies: the inside-out cut.

If, on the other hand, you enjoy the art of piping dots and strings or think a cookie's not complete without an intricate, sugared design, you must read the post by new blogger MaryJane Robbins, who creates some amazingly beautiful jumbo cookies:

The Other Cookie Baker

Of course, if you believe form follows function, try PJ's elegant, chocolate-dipped approach to cookie decoration to create a European-style treat:

The REAL holiday crunch: Vanilla Dreams

Cookie Calendar: Chocolate Crinkles

chocolate-crinkles02.jpg

You could call these brownie cookies, they're so rich and fudgy. The centers stay soft and gooey as they bake a mere eight to 10 minutes, and the surface takes on the same sort of shiny, crackled appearance.

That is, where you can see it through the powdered sugar dusting the outside of these cookies. You roll one-inch dough balls around in the snowy sweetener before baking, and as they rise and spread in the oven, crevices of chocolate break through the white surface. The result resembles snow-covered hills.

chocolate-crinkles01.jpg

These cookies look festive, yet they're among the easiest to pull off. You melt some chocolate in the microwave, dump everything but the flour into a bowl, mix, then beat in the flour. Chill a couple hours to firm up the dough, then use a medium cookie scoop to portion it out into a pie plate full confectioner's sugar. Roll the balls around, place them on a cookie sheet, pop them in the oven, and watch the magic unfold.

Taste? If you like fudgy brownies, you'll love these.

My comments in [brackets].

chocolate-crinkles02.jpgChocolate Crinkles
Source: Better Homes & Gardens New Cook Book
Yield: makes about 48 cookies [I got closer to three dozen.]

3 eggs
1½ cups granulated sugar
4 ounces unsweetened chocolate, melted
½ cup cooking oil
2 teaspoons baking powder
2 teaspoons vanilla
2 cups all-purpose flour
Sifted powdered sugar

1. In a large mixing bowl, beat eggs, granulated sugar, chocolate, oil, baking powder, and vanilla with an electric mixer until combined. Beat in as much of the flour as you can with the mixer. Stir in any remaining flour. Cover and chill dough for 1 to 2 hours or until easy to handle.

2. Shape dough into 1-inch balls. Roll balls in powdered sugar to coat generously. Place balls 1 inch apart on an ungreased cookie sheet. Bake in a 375 degrees F oven for 8 to 10 minutes or until edges are set and tops are crackled. Transfer to a wire rack and let cool. If desired, sprinkle with additional powdered sugar.